Tuesday, 28 February 2017

Updating a Live App

Original post: https://support.magplus.com/hc/en-us/articles/203808518-iOS-Updating-a-Live-App

Building and submitting an update to your iOS app is much easier than creating it for the first time. The following is a step-by-step guide to the process.
Important Information
If you are creating a new Mag+ app to overwrite an existing app created in another platform, you normally cannot use a Push Notification to send a message to users of the older app. The Push Notification would only go to users of the new Mag+ app. Your new app may, however, qualify for a Transfer, which does allow you to send a Push Notification to users of the old app. This would allow you to inform them of your update. For more information and eligibility requirements, read the Apple article "Transferring and Deleting Apps."
You cannot, unfortunately, use the "Transfer App" feature if your older app offered free subscriptions and your new app requires paid subscriptions.

How to Update Your iOS App in the Apple App Store

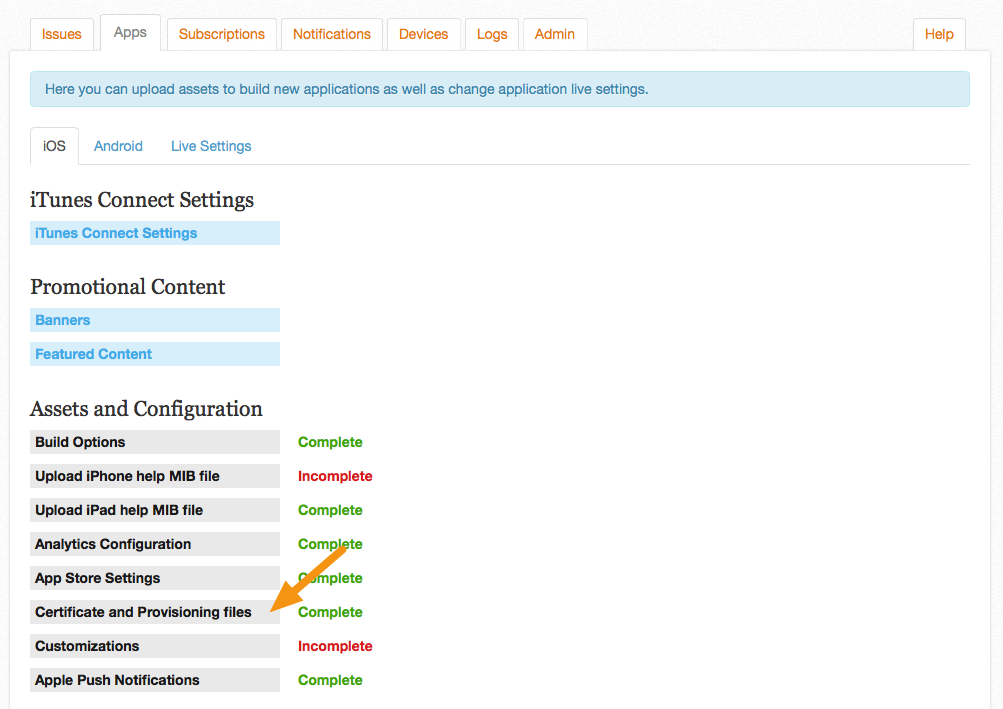
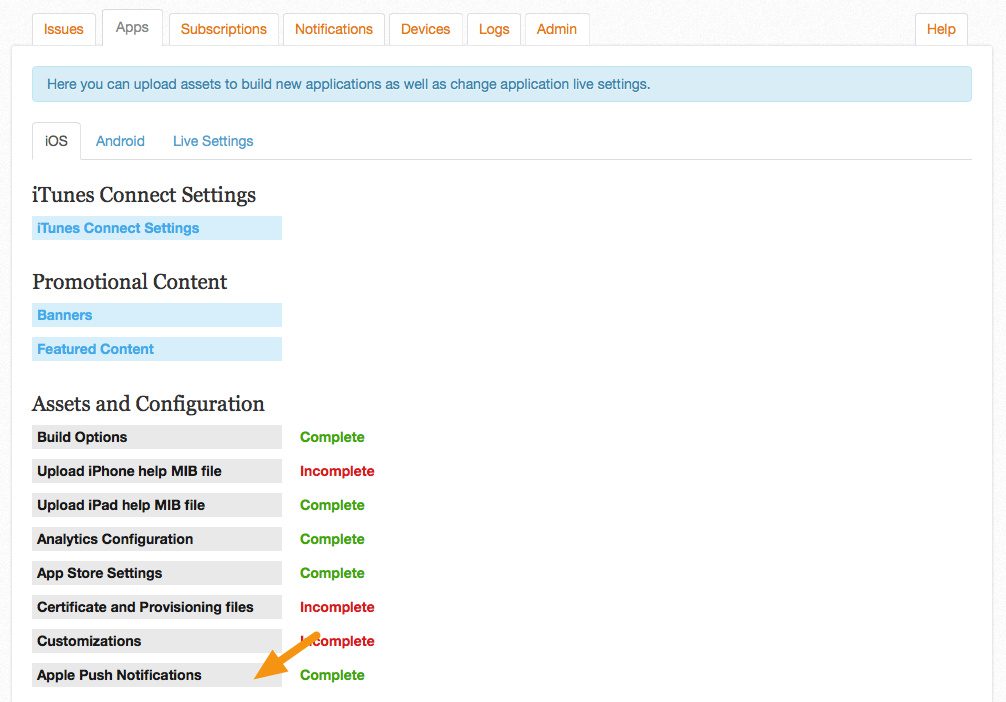
1. Log into your Mag+ Publish account and click on the "Apps" tab.

Log into your Mag+ Publish account and click on the "Apps" tab.

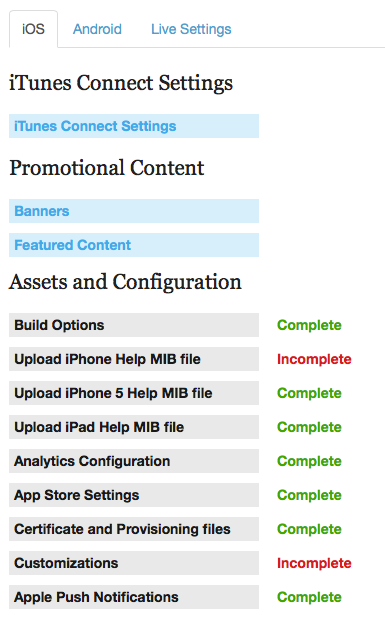
2. Change your Build Options or Customizations as needed.

Each section of the Assets and Configuration area features a label indicating whether all the required information has been completed. If an area requires more configuration, or if a validity check fails, then the section will read "Incomplete" and you will not be allowed to create a new build.
Change your Build Options or Customizations as needed.

3. Once all fields have a "Complete" label, you can click the "Generate New Build" button at the bottom of the screen.

Once all fields have a "Complete" label, you can click the "Generate New Build" button at the bottom of the screen.

4. In a few minutes, you can reload the page and see a new time-stamped link to a package containing your app file.

In a few minutes, you can reload the page and see a new time-stamped link to a package containing your app file.
The ".tgz" link downloads a package of files to your computer. Inside is a "AppStore_x.x.ipa" file that you can upload to iTunes Connect for submission to the Apple App Store.
Note: There is also a "Send e-mail" link that generates an email you can send to anyone who has a device saved on your ad hoc certificate. Those users can then click on this link from their iOS device (or paste it into Safari on their iOS device) and it will download and install the test version of the app.

5. Test your updated app before submitting it to Apple.

In the ".tgz" package is an "Adhoc_x.x.ipa" file you can drag to your iTunes application to install it on your iOS devices for testing. You can also read more about testing your app in the article "iOS - How to Install Your Test App."

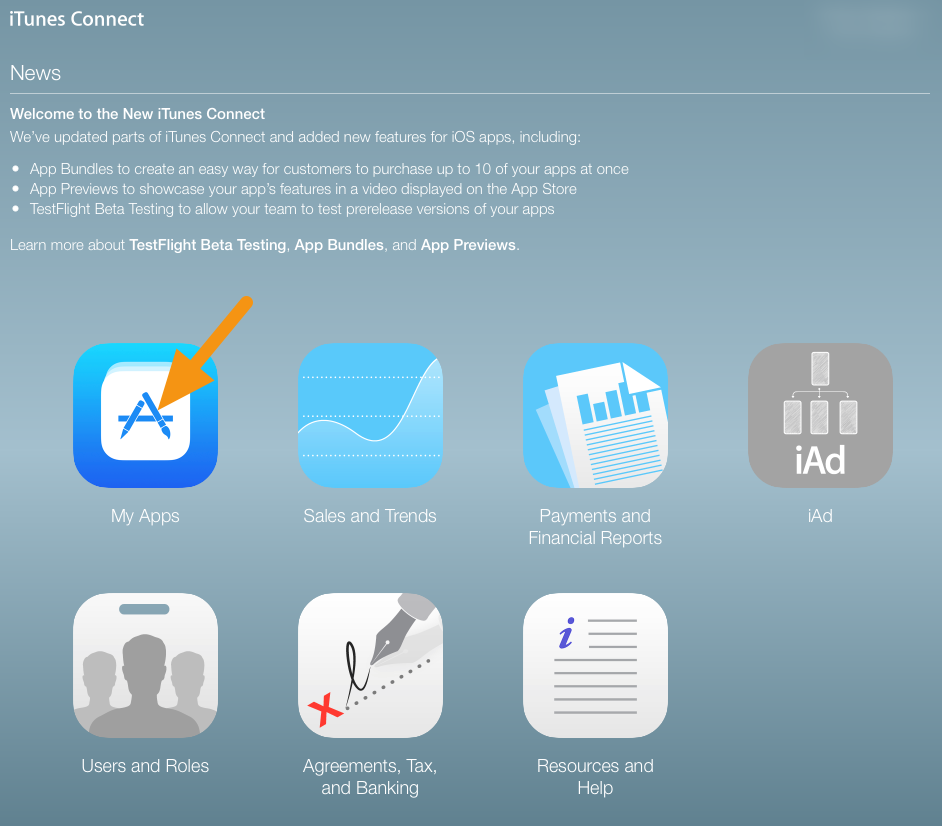
6. Log into iTunes Connect and click on "My Apps."

Log into iTunes Connect and click on "My Apps."

7.  Click on the "+ VERSION OR PLATFORM" button to create a new version of your app.

 Click on the "+ VERSION OR PLATFORM" button to create a new version of your app.

8. In the window that appears, enter the new version number of your app and click on "Create."

Note: This version number is the version of your app displayed in the Apple Store. It is not the Mag+ version number.
In the window that appears, enter the new version number of your app and click on "Create."

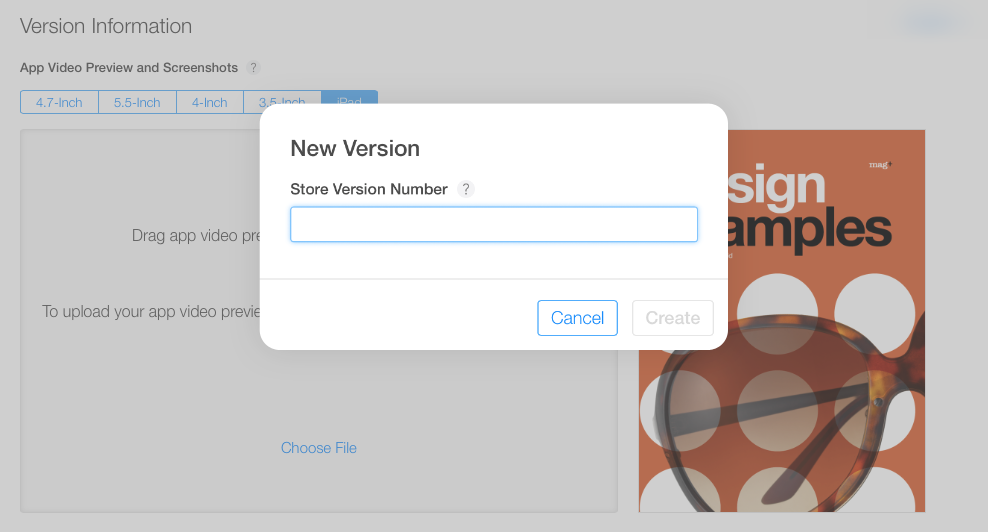
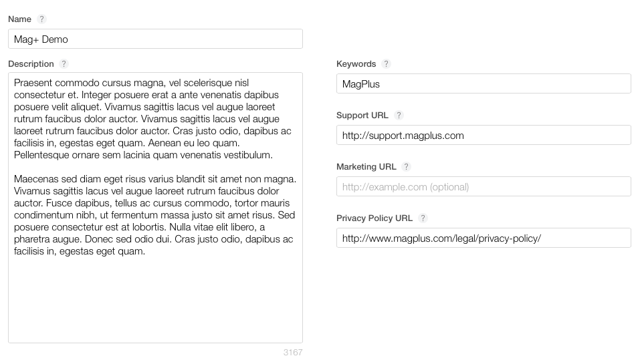
9. Review the metadata in the new version and make any changes to screenshots, description, etc.

Note: Any changes you make will only get published when the new version goes live. Your current copy and metadata will remain the same until then.
Review the metadata in the new version and make any changes to screenshots, description, etc.

10. Upload your new build using Application Loader.

Please refer to our Uploading Builds Using Application Loader article for reference.
The "AppStore_x.x.ipa" file to upload is located within the ".tgz" file you downloaded from the Mag+ Publish portal.
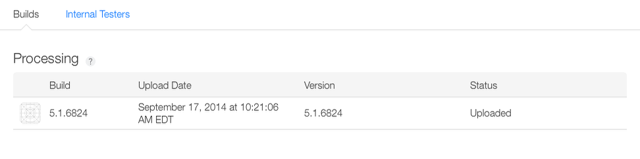
Note: Do not submit the file labeled "dSYM", only the "AppStore_x.x.ipa".

11. When submitted, the build will go through a "Processing" stage to check for errors.

This status of your upload is visible in the "Prerelease" tab on the App Summary page. When this stage is complete, you will be able to select the build as a new version of your app.
When submitted, the build will go through a "Processing" stage to check for errors.

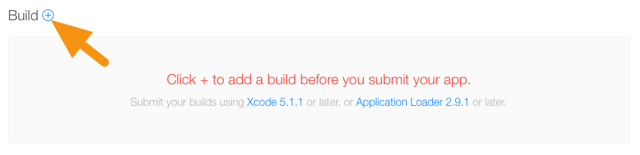
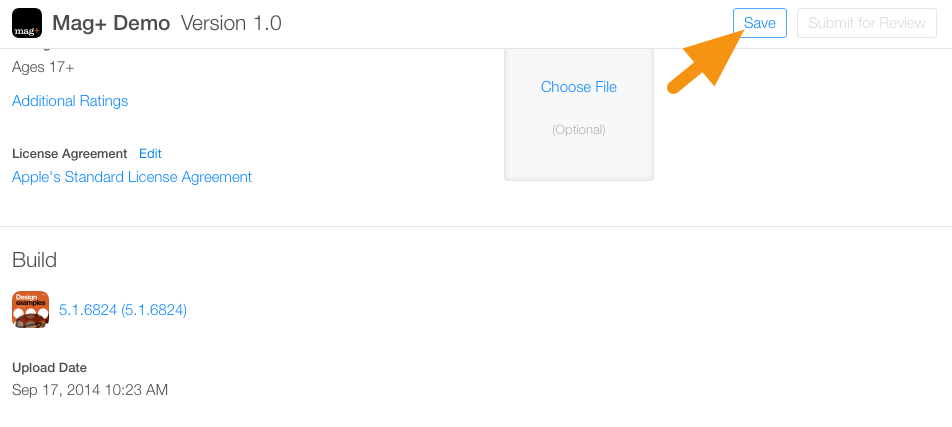
12. In the "Versions" tab, scroll to the "Build" section and click the "+" icon.

In the "Versions" tab, scroll to the "Build" section and click the "+" icon.

13. In the window that appears, select the build you want to submit and click "Done."

In the window that appears, select the build you want to submit and click "Done."

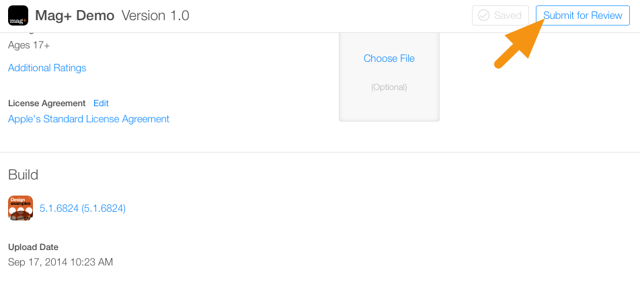
14. Now click on the "Save" button in the upper right-hand corner of the screen.

This will save your build selection for the current version.
Now click on the "Save" button in the upper right-hand corner of the screen.

15. The "Submit for Review" button will then become active.

The "Submit for Review" button will then become active.

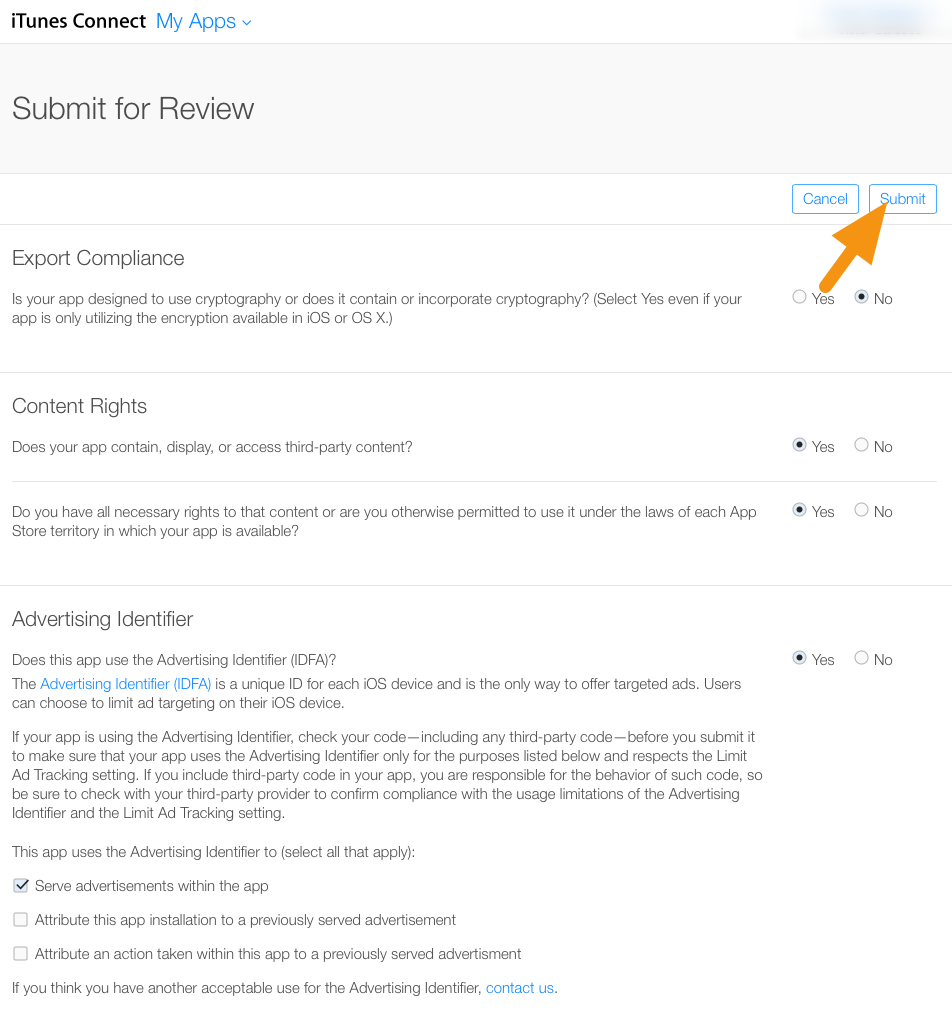
16. Click on "Submit for Review" and answer Apple's final questions about your app and then click on "Submit."

For more information on what to check for "Advertising Identifier" information, refer to the "Notifying Apple of Advertising Identifier (IDFA)" section of the article "iOS - Adding Third-Party Integrations."
Click on "Submit for Review" and answer Apple's final questions about your app and then click on "Submit."

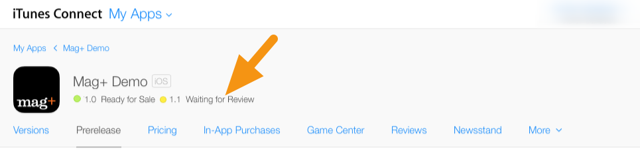
17. After a successful submission, your status will change to "Waiting for Review."

After a successful submission, your status will change to "Waiting for Review."
Note: At this point you cannot make any changes to the metadata until after the app is approved.
Updates take about as long to approve as new submissions, so you must wait for Apple to approve the submission. If you are updating your app to fix a critical bug, you can request an expedited review, but use this only for emergencies.

Renewing an Ad Hoc Distribution Provisioning Profile

Original post: https://support.magplus.com/hc/en-us/articles/204967397-iOS-Renewing-an-Ad-Hoc-Distribution-Provisioning-Profile

When a Distribution Certificate is about to expire, you must create a new certificate and then create new App Store and Ad Hoc Provisioning Profiles that use the new certificate. These files are uploaded to the Mag+ Publish portal where you then rebuild your app and submit an update to iTunes Connect.
This article will walk you through creating a new Ad Hoc Distribution Provisioning Profile with your new Distribution Certificate.
Note: Test Devices in an Ad Hoc profile are different than Test Devices defined in the Mag+ Publish portal. Test devices in an Ad Hoc profile allow you to test your app on select devices before the app is made live. Test Devices in Mag+ allow you to test content from the Mag+ Publish portal before it is published.
Before You Begin

How to Create a New Ad Hoc Distribution Provisioning Profile with a Renewed Distribution Certificate

1. To login into the iOS Developer Console goto <https://developer.apple.com> and click Account at the top

To login into the iOS Developer Console goto &lt;https://developer.apple.com&gt; and click Account at the top

2. Click "Certificates, Identifiers & Profiles."

Click &quot;Certificates, Identifiers &amp; Profiles.&quot;

3. Click on "Distribution" under the "Provisioning Profiles section.

Click on &quot;Distribution&quot; under the &quot;Provisioning Profiles section.

4. Click on the "+" button to add a new profile.

Click on the &quot;+&quot; button to add a new profile.

5. Click on the radio button next to "Ad Hoc" and then click on "Continue."

Click on the radio button next to &quot;Ad Hoc&quot; and then click on &quot;Continue.&quot;

6. From the pop-up menu, choose the App ID associated with your app and then click "Continue."

From the pop-up menu, choose the App ID associated with your app and then click &quot;Continue.&quot;

7. Click on the radio button next to your new Distribution Certificate and click on "Continue."

Note: For more information on Distribution Certificates, read the article "iOS - Renewing a Distribution Certificate."
Click on the radio button next to your new Distribution Certificate and click on &quot;Continue.&quot;

8. Place a checkmark next to the test devices where you will install your app and click "Continue."

Note: Your app will only run on the devices you check. Any time you add or remove a device, you will need to generate a new Ad Hoc Profile.
Place a checkmark next to the test devices where you will install your app and click &quot;Continue.&quot;

9. Enter your app name and "-AdHoc" in the name field and click on "Generate."

Note: Since this is a renewed profile, you may want to identify it somehow in the name to differentiate it from your old profile.
Enter your app name and &quot;-AdHoc&quot; in the name field and click on &quot;Generate.&quot;

10. Click on the "Download" button to download your new Ad Hoc Distribution profile.

Note: Your Ad Hoc Distribution Provisioning Profile can now be uploaded to the Mag+ Publish portal.

11. Login to the Mag+ Publish portal <https://publish.magplus.com> and go to Apps > iOS > Certificate and Provisioning Files.

Login to the Mag+ Publish portal &lt;https://publish.magplus.com&gt; and go to Apps &gt; iOS &gt; Certificate and Provisioning Files.

12. Delete the existing Ad Hoc profile, upload your new profile, and click on "Save."

Delete the existing Ad Hoc profile, upload your new profile, and click on &quot;Save.&quot;

Certificate Renewal: Next Steps

After uploading your new Ad Hoc Provisioning Profile, you can now build a new app that uses your new certificates and provisioning profiles.
Note: If you use Push Notifications, you may want to renew your Push Notification Certificate as well. For more information, read the article "iOS - Renewing a Push Notification Certificate."
After building your app, you can now submit an app update to iTunes Connect. For more information, read the article "iOS - Updating a Live App."

Renewing an App Store Distribution Provisioning Profile

Original post: https://support.magplus.com/hc/en-us/articles/204967347-iOS-Renewing-an-App-Store-Distribution-Provisioning-Profile

When a Distribution Certificate is about to expire, you must create a new certificate and then create new App Store and Ad Hoc Provisioning Profiles that use the new certificate. These files are uploaded to the Mag+ Publish portal where you then rebuild your app and submit an update to iTunes Connect.
This article will walk you through creating a new App Store Distribution Provisioning Profile with your new Distribution Certificate.
Before You Begin

How to Create a New App Store Distribution Provisioning Profile with a Renewed Distribution Certificate

1. To login into the iOS Developer Console goto <https://developer.apple.com> and click Account at the top

To login into the iOS Developer Console goto &lt;https://developer.apple.com&gt; and click Account at the top

2. Click "Certificates, Identifiers & Profiles."

Click &quot;Certificates, Identifiers &amp; Profiles.&quot;

3. Click on "Distribution" under the "Provisioning Profiles section.

Click on &quot;Distribution&quot; under the &quot;Provisioning Profiles section.

4. Click on the "+" button to add a new profile.

Click on the &quot;+&quot; button to add a new profile.

5. Click on the radio button next to "App Store" and then click on "Continue."

Click on the radio button next to &quot;App Store&quot; and then click on &quot;Continue.&quot;

6. From the pop-up menu, choose the App ID associated with your app and then click "Continue."

From the pop-up menu, choose the App ID associated with your app and then click &quot;Continue.&quot;

7. Click on the radio button next to your new Distribution Certificate and click on "Continue."

Note: For more information on Distribution Certificates, read the article "iOS - Renewing a Distribution Certificate."
Click on the radio button next to your new Distribution Certificate and click on &quot;Continue.&quot;

8. Enter your app name and "-AppStore" in the name field and click on "Generate."

Note: Since this is a renewed profile, you may want to identify it somehow in the name to differentiate it from your old profile.
Enter your app name and &quot;-AppStore&quot; in the name field and click on &quot;Generate.&quot;

9. Click on the "Download" button to download your new App Store Distribution profile.

Note: Your App Store Distribution Provisioning Profile can now be uploaded to the Mag+ Publish portal.

10. Login to the Mag+ Publish portal <https://publish.magplus.com> and go to Apps > iOS > Certificate and Provisioning Files.

Login to the Mag+ Publish portal &lt;https://publish.magplus.com&gt; and go to Apps &gt; iOS &gt; Certificate and Provisioning Files.

11. Click "Change" for the existing App Store profile, upload your new profile, and click on "Save."

Click &quot;Change&quot; for the existing App Store profile, upload your new profile, and click on &quot;Save.&quot;

Certificate Renewal: Next Steps

After uploading your new App Store Provisioning Profile, you will now need to generate a new Ad Hoc Provisioning profile that uses that certificate. An Ad Hoc Provisioning Profile lets you install your app on private devices for testing prior to making it live. For more information, read the article "iOS - Renewing an Ad Hoc Distribution Provisioning Profile."

Creating a Push Notification Certificate

Original post: https://support.magplus.com/hc/en-us/articles/203808718-iOS-Creating-a-Push-Notification-Certificate

Push Notification Certificates let you send notifications to users of your app. They must be created before a Provisioning Profile since they are embedded within the Provisioning Profile.
Note: While Push Notification Certificates are optional for regular iOS apps, they are required for Newsstand apps.
If you are unsure if your Provisioning Profile has Push Notifications enabled, read the article "iOS - Check if your Provisioning Profiles Accept Push Notifications."
Before You Begin

How to Create a Push Notification Certificate

1. Login to the iOS Dev Center <https://developer.apple.com/devcenter/ios/> and click on "Certificates, Identifiers & Profiles."

2. Click on the link labeled "Identifiers."

3. Click on the App ID you created previously for your app.

4. On the screen that appears, click on the "Edit" button.

5. Place a checkmark next to "Push Notifications" and then, under Production SSL Certificate, click on the "Create Certificate" button.

6. On the screen that appears, click on the "Continue" button.

Note: Be sure you have your Distribution Certificate available before proceeding. The certificate is referred to as a CSR file and has a default extension of ".certSigningRequest." If you don't, please read the article "iOS - Creating a Distribution Certificate and .p12 File."

7. Click on the "Choose File" button and select the CSR (Certificate Signing Request) file you have downloaded, then click on "Generate."

8. Click on the "Download" button to download your new Push Notification Certificate and then click on "Done."

9. Double-click the ".cer" file to install it in Keychain Access.

It will have the name "Apple Production iOS Push Services" and will expire one year from today's date. You can then export it as a .p12 file (see below) and upload it to the Mag+ Publish portal.

How to Export a Push Notification Certificate as a .p12 File

1. In Keychain Access, select the certificate entry and right-click on it to select "Export."

Note: All certificates you have installed will be in the "login" keychain (Label 1) under the category "My Certificates" (Label 2).

2. In the window that appears, add "Push-" to the file name, make sure the File Format is set to "Personal Information Exchange (.p12)" and click on "Save" to save it to your machine.

3. When asked for a password, leave it blank and click on "Ok."

Note: You MUST NOT enter a password in this step, otherwise the Mag+ Publish portal will be unable to build your app.

4. When asked for the computer password, enter it and click on "Allow."

5. Your .p12 file will be saved in the location you specified.

Note: You can now upload your .p12 file to the Mag+ Publish portal and use it to create a Provisioning Profile.

6. Login to the Mag+ Publish portal <https://publish.magplus.com> and go to Apps > iOS > Apple Push Notifications.

7. Click on "Choose File" and upload the .p12 version of your Apple Push Notification Certificate you created above, and then click "Save."

App Creation: Next Steps

Creating push notification certificates are only one step in creating an iOS app for distribution. Please refer to the additional articles in this section for information on setting up provisioning profiles and configuring in-app purchases. These items correspond to settings in the Mag+ Publish portal. The portal will actually build your customized iOS app. You will then upload this app to the Apple App Store or to your own internal distribution servers (for enterprise customers only).